When and How to Harvest and Cure Garlic
How to read the harvest signal, dig garlic without damaging it, and the multi-week curing process that determines how long a harvest actually stores.
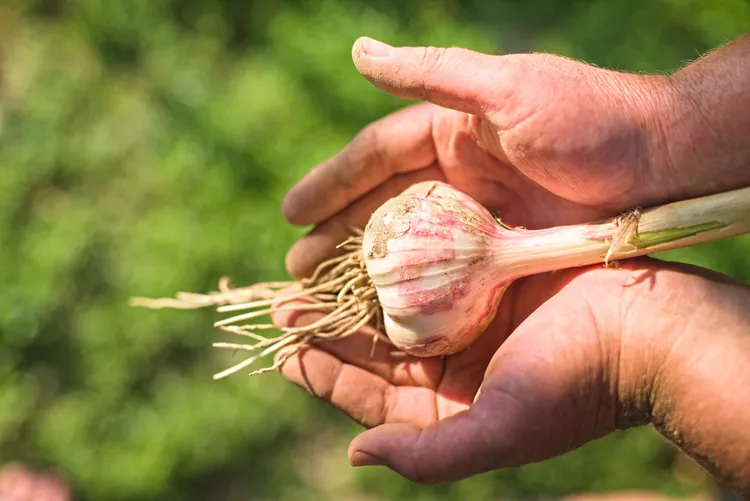
A freshly dug garlic bulb looks finished but isn't. Curing, several weeks of controlled drying, is what actually determines how long that bulb keeps afterward, and skipping or rushing it is one of the most common reasons home-grown garlic doesn't store as well as expected.
Reading the Harvest Signal
Leaf browning is the primary harvest cue: once roughly 40 to 60% of a plant's leaves have browned from the bottom up, with some green remaining at the top, the bulb below has typically finished sizing up and is ready to dig. Waiting for all leaves to brown completely, which might seem like the more "finished" signal, actually risks the opposite problem, bulbs that have begun splitting apart underground or losing their protective outer wrapper, both of which shorten storage life.
If uncertain, digging up a single test bulb and checking the clove definition (distinct, well-formed cloves versus a still-undifferentiated round) gives a direct answer more reliable than leaf appearance alone.
Digging, Not Pulling
Garlic bulbs should be loosened with a garden fork before lifting, not pulled directly by the stalk, which risks snapping the neck away from the bulb or damaging the papery outer wrapper that protects the cloves during curing and storage. Dig a few inches out from the visible stalk to avoid piercing the bulb itself with the fork tines, then lift gently.
Handling Freshly Dug Bulbs
Freshly harvested garlic is far more delicate than the dried, papery bulbs sold in stores. Handle it gently to avoid bruising, and resist the urge to wash off soil immediately; excess moisture at this stage slows curing and increases mold risk. Gently brush off loose soil by hand and leave the roots and stalk attached for now, both of which get trimmed only after curing is complete.
The Curing Process
Curing means drying garlic slowly in a well-ventilated, shaded, dry location for 2 to 4 weeks, allowing the outer skins to fully dry and tighten around the cloves while the neck seals shut, both of which are what actually protect the bulb during long-term storage. A garage, covered porch, or shed with good airflow and protection from direct sun and rain works well; direct sunlight during curing can scorch or discolor bulbs, and moisture exposure invites mold.
Hanging bulbs in small bunches, or laying them in a single layer on a screen or mesh rack that allows air circulation from below as well as above, both work. Whatever the setup, avoid piling bulbs deep or packing them tightly, since trapped moisture between bulbs is a common cause of spoilage during curing.
Knowing When Curing Is Complete
Fully cured garlic has papery, dry outer skin, a firm, tightly closed neck, and dry, brittle roots. The neck specifically is a reliable indicator: a neck that's still soft or green hasn't finished curing, while a fully dry, tight neck signals the bulb is ready for trimming and storage. This typically takes 2 to 4 weeks depending on humidity and airflow in the curing location, with drier, better-ventilated spaces curing faster than humid or still ones.
Trimming After Curing
Once fully cured, trim roots close to the base of the bulb and cut stalks down to about an inch (2.5cm) above the bulb, unless you're planning to braid softneck varieties, in which case stalks are left long and pliable specifically for that purpose. At this point bulbs are ready for long-term storage, covered in our storage guide.
What Rushing Curing Actually Costs
Garlic cured for only a week or so, rather than the full 2 to 4 weeks, often looks superficially fine but stores noticeably worse, softening, sprouting, or developing mold well before properly cured garlic from the same harvest would show any decline. The time investment at this stage directly determines how many months of usable garlic a single harvest actually provides, making it one of the highest-leverage steps in the entire lifecycle relative to the effort involved.
Frequently Asked Questions
Can I eat garlic before it's fully cured? Yes, freshly dug, uncured garlic ("green garlic" or "wet garlic") is a genuine seasonal ingredient with a milder, juicier character than cured garlic, popular in some cuisines specifically for this fleeting fresh form. Set aside a portion of the harvest to eat fresh if you want to try it, since it doesn't keep long uncured.
What if it rains during my curing period? A single light rain exposure to bulbs curing outdoors under adequate cover generally isn't catastrophic, but consistent damp conditions meaningfully slow curing and raise mold risk. Moving bulbs to a covered, better-ventilated space at the first sign of a wet stretch protects the harvest more reliably than hoping conditions improve.
Does curing time differ between hardneck and softneck garlic? Not dramatically; both benefit from the same general 2 to 4 week window, though softneck's more flexible stalks are notably easier to braid once cured, a storage method covered in the next stage.
How do I know if a bulb went bad during curing rather than just curing normally? Genuine spoilage shows as soft spots, visible mold, or a distinctly off smell, distinct from the normal appearance of drying, tightening skin. Any bulb showing these signs should be removed from the curing batch promptly to avoid affecting nearby bulbs.
Handling a Larger Harvest
A productive garlic bed can produce dozens of bulbs at once, all needing curing space simultaneously, which is worth planning for ahead of harvest time rather than scrambling to find adequate ventilated space once bulbs are already out of the ground. A dedicated curing area, even a temporary one set up specifically for the 2 to 4 week window each year, prevents the common mistake of piling too many bulbs into too little space, which slows curing and raises mold risk exactly as described above.
Curing in Humid Climates
Gardeners in naturally humid regions sometimes need to supplement passive airflow with an actual fan directed gently across curing bulbs, since natural air movement alone may not be sufficient to dry bulbs adequately within a reasonable timeframe. A small oscillating fan on a low setting, positioned to move air across (not directly onto) hanging or laid-out bulbs, can make a meaningful difference in curing outcomes in consistently humid conditions.
Curing Space Setup Options
- Hanging in small bunches: Traditional and effective, particularly for softneck varieties whose flexible stalks make bunching and hanging straightforward.
- Single-layer on a screen or mesh rack: Allows airflow from below as well as above, useful for hardneck varieties without flexible stalks for hanging, or for gardeners without adequate hanging space.
- Slatted crates or open baskets: A middle-ground option, providing some airflow while keeping bulbs contained and easy to move if weather conditions change during the curing period.
What a Well-Cured Bulb Looks Like Compared to a Poorly Cured One
A well-cured bulb has papery, rustling outer skin that's fully dry to the touch, a firm neck with no give when gently squeezed, and roots that snap rather than bend when handled. A poorly or incompletely cured bulb, by contrast, often has a neck that still feels slightly soft or fleshy, skin that feels tacky rather than dry and papery, and roots that remain flexible rather than brittle. Comparing a few bulbs directly against these criteria before moving a batch into long-term storage is a worthwhile final check.
Frequently Asked Questions
Can I speed up curing artificially, with a dehydrator or low oven? This isn't generally recommended for bulbs meant for long-term storage; artificial heat-drying can affect the outer skin's protective quality differently than slow, ambient-temperature curing, potentially reducing storage life even though the bulb looks dry. Reserve dehydrator or oven drying for garlic specifically destined for immediate use or powder-making, not for bulbs meant to store for months.
Is there a risk of garlic curing for too long? Once fully cured (dry skin, firm neck, brittle roots), leaving bulbs in the curing space longer than necessary before moving to storage doesn't provide additional benefit and simply delays the point at which garlic becomes available for use; it's not harmful, just unnecessary once the bulb has reached the fully cured state.
Should I sort bulbs by size before curing or after? Either works, though sorting after curing, once final size and quality are fully apparent, gives a clearer picture for deciding which bulbs to reserve as seed stock for next season's planting versus which to use first in the kitchen.
What's the ideal humidity level for a curing space? Roughly 60 to 70% relative humidity with good airflow is often cited as ideal, balancing slow enough drying to avoid stressing the bulbs against fast enough drying to avoid mold risk; in practice, most home curing setups don't measure humidity precisely and instead rely on visual and tactile cues for the bulbs themselves.
A Simple Harvest and Curing Checklist
- Watch for 40 to 60% leaf browning as the harvest signal.
- Loosen soil with a garden fork before lifting bulbs.
- Brush off loose soil gently; avoid washing before curing.
- Cure 2 to 4 weeks in a shaded, dry, well-ventilated space.
- Check for a firm, fully dry neck before moving to long-term storage.
- Trim roots and stalks once curing is complete.
Learning From Each Season's Harvest
Noting how a given season's harvest cured, how long it took, whether any bulbs showed early signs of mold or incomplete drying, builds useful knowledge for adjusting curing setup in future seasons, whether that means more airflow, a different location, or simply more patience before moving bulbs to long-term storage.
Building the Habit of Checking Plants Regularly
As harvest time approaches, checking plantings every few days rather than waiting for a single obvious signal helps catch the ideal harvest window, neither too early nor too late, more reliably than an infrequent check-in. A quick walk through the garlic bed, watching leaf color from the base upward, takes only a few minutes but meaningfully improves harvest timing.
Curing Habits That Compound Across a Harvest
A single bulb cured imperfectly barely matters in isolation, but the habit, consistent airflow, adequate space between bulbs, patience through the full 2 to 4 week window, compounds across an entire harvest. Applying good curing practice consistently produces a noticeably better-storing harvest overall than treating curing as a rushed afterthought.
Learning to Trust the Process Over Multiple Seasons
First-time garlic growers sometimes second-guess the curing timeline, wondering whether 2 weeks is really not enough or whether 4 weeks is excessive. Trusting the tactile signals, a fully dry, papery skin and a firm, sealed neck, over an arbitrary calendar count is the more reliable approach, since curing speed genuinely varies season to season based on humidity and airflow conditions that a fixed number of days can't fully account for.
Curing Multiple Varieties Separately
When curing both hardneck and softneck varieties from the same harvest, keeping them in clearly separated, labeled groups during curing avoids confusion later, particularly useful since the two types eventually move into different storage methods, braiding for softneck, bins or hanging for hardneck, once curing is complete.
Of every stage in this framework, harvest and curing is where patience most directly pays off in storage life. A grower willing to wait for the full curing window, rather than rushing bulbs into storage early, gets meaningfully more usable garlic out of the same harvest than one who cuts curing short.
Treating this stage with real care, rather than rushing toward the more immediately rewarding cooking and eating stages that follow, is consistently what separates a harvest that lasts through winter from one that declines within weeks.
By the time a batch reaches full cure, the reward for that patience becomes clear the moment a bulb is finally cracked open in the kitchen, tight, dry, and ready for months of good use ahead.
Few kitchen rewards feel as earned as a well-cured head of garlic pulled from a season's own harvest.
That reward is worth protecting by giving curing the full time it genuinely needs, rather than rushing toward the storage and cooking stages that come next.
Latest