Onigiri: Japanese Rice Balls for Lunch Prep
Onigiri are portable, filling, and easy to make in batches on a Sunday evening for the week ahead. This guide covers the rice, shaping technique, and the best fillings - from classic tuna mayo to pickled plum and grilled salmon.
Convenience stores in Japan sell onigiri for around 120-150 yen each - roughly £0.65-0.80 - and they are genuinely excellent: perfectly seasoned rice, generous fillings, crisp nori added just before eating. The home version costs a fraction of that, takes about 20 minutes to make a batch of six, and is easily the best packed lunch going. Cold, portable, no reheating required.
The Rice
Onigiri only works with Japanese short-grain rice - the starch content makes it sticky enough to hold its shape. Medium-grain rice is an acceptable substitute. Long-grain or basmati rice will not work.
Cook the rice as you normally would, but slightly firmer than usual (reduce the water ratio slightly - try 1 part rice to 1.05 parts water instead of 1:1.1). Season while warm with a pinch of salt and, optionally, a teaspoon of rice vinegar per cup of dried rice. Let the rice cool until it's comfortable to handle but still warm - cold rice doesn't compress as well.
For a properly seasoned base, this sushi rice recipe works well as an onigiri rice too, though traditional onigiri rice is lightly salted rather than vinegared.
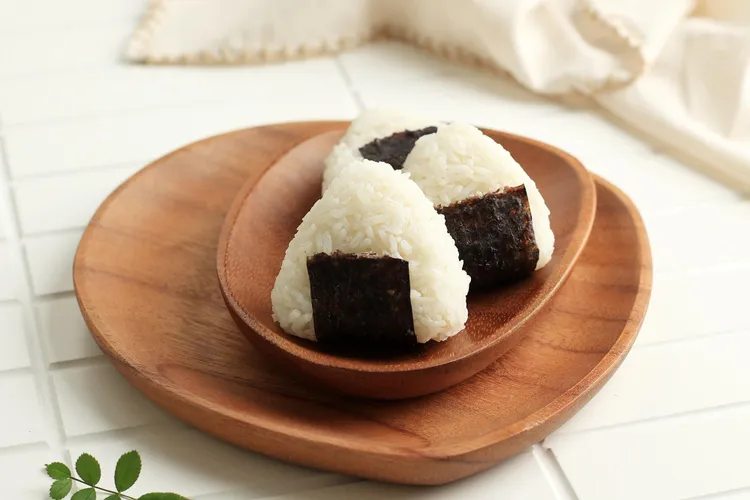
Shaping
Wet your hands with cold water and apply a small pinch of salt to each palm - this prevents sticking and seasons the outside of the rice. Take about 100-120g of warm rice (roughly a generous handful). Flatten it slightly in one palm, add filling in the centre, then close the rice around the filling and compress firmly into a triangle shape using both hands. Press the three faces of the triangle firmly enough that the rice holds together, but not so hard that it becomes dense.
Wrap the bottom edge with a strip of nori (roasted seaweed). For the authentic convenience store experience, wrap in plastic and add a full nori sheet that stays separate until eating - the double-wrap technique (using a sheet of cling film as a divider) keeps the nori crisp.
For the seaweed-wrapped version right away, try these seaweed onigiri balls - round-shaped rather than triangular, but the same basic technique.
Fillings
The best onigiri fillings have strong flavour in a small quantity - this is important, because there is a lot of rice and not much filling. These are the most common:
- Tuna mayo (tuna mayo onigiri): Tinned tuna drained well, mixed with Japanese mayonnaise (Kewpie if possible), a drop of soy sauce. The most popular convenience store filling.
- Pickled plum (ume onigiri): A single umeboshi (pickled plum) in the centre. Sour, salty, no preparation needed. Keeps the rice fresher for longer due to the acidity.
- Grilled salmon (sake onigiri): Lightly salted salmon, grilled and flaked. Season more aggressively than you think - it needs to hold its flavour against the plain rice.
- Mentaiko (spicy cod roe): Strong and savoury. A small amount goes a long way.
- Okaka: Bonito flakes mixed with soy sauce. The simplest filling and often the most satisfying.
- Cheese and soy sauce: Not traditional, but works - small cube of melty cheese, drop of soy sauce.
Nutrition Estimate (per onigiri)
- Plain onigiri (no filling, with nori): ~160 kcal, 3g protein
- Tuna mayo: ~210 kcal, 8g protein
- Grilled salmon: ~200 kcal, 9g protein
- Umeboshi: ~165 kcal, 3g protein
All values are estimates based on 110g rice per onigiri. Two onigiri with a side of miso soup makes a complete lunch at around 450-480 kcal.
Storage and Meal Prep
Onigiri are best eaten within a few hours of making, at room temperature or cold. If refrigerating overnight, wrap tightly in cling film - the rice will harden slightly in the fridge. Remove 20-30 minutes before eating or microwave for 30-40 seconds through the wrap.
For a full week of Japanese home cooking that includes onigiri as a lunch option, see the Japanese home cooking guide.
Latest